Embarking on the journey of crafting a paper mache tarantula is a rewarding experience, blending artistry with the satisfaction of creating something unique. This comprehensive guide will walk you through each step, from gathering your materials to adding those final, realistic touches that will bring your paper mache tarantula to life. Whether you’re a seasoned crafter or a beginner, this project is accessible and adaptable, promising a fun and engaging creative outlet. Get ready to transform simple materials into a stunning arachnid sculpture!
Materials Needed for Your Paper Mache Tarantula
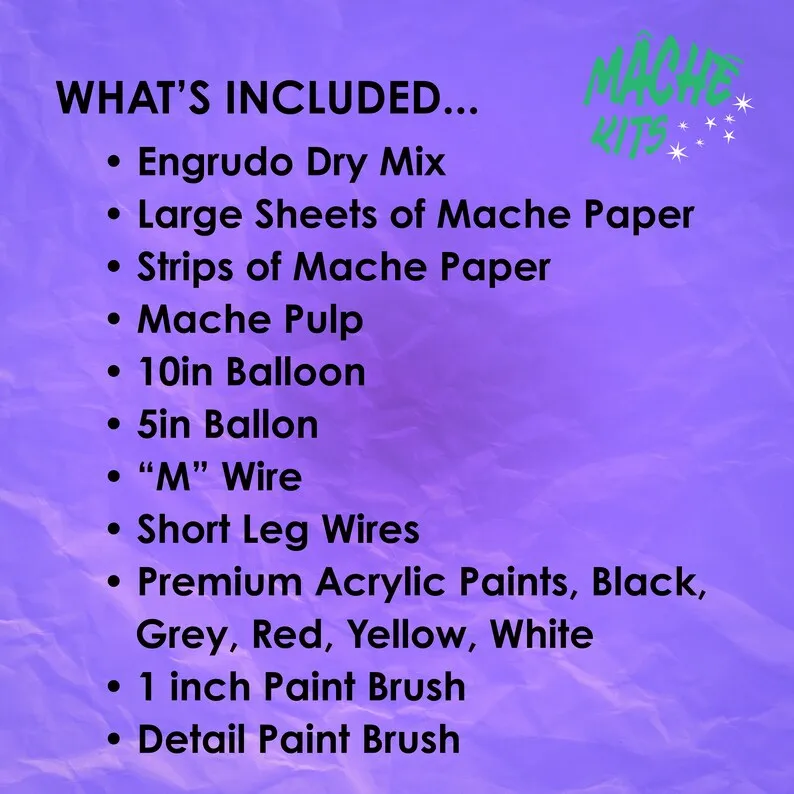
Before diving into the construction of your paper mache tarantula, it’s crucial to gather all the necessary materials. Having everything prepared will streamline the process and ensure a smooth, enjoyable crafting experience. The following list encompasses the essentials, ensuring you’re well-equipped to bring your tarantula vision to life. Remember to consider these as starting points, feel free to adjust based on your preferences and the specific look you aim to achieve for your spider. Proper preparation is key to a successful and satisfying paper mache project, so let’s ensure we’re set up for success.
Choosing the Right Paper and Glue
The choice of paper and glue is fundamental to the durability and texture of your paper mache tarantula. For the paper, consider using a mix of newspaper for the base layers and tissue paper or thin cardstock for the finer details and surface finish. The type of paper used will impact the final texture and how well it holds paint. For glue, a homemade paste made from flour and water is a classic and budget-friendly option. Alternatively, you can use PVA glue, diluted with water to achieve a suitable consistency for paper mache. The glue’s consistency is vital; it should be thin enough to penetrate the paper but thick enough to hold the layers together. The glue must be applied evenly.
Gathering Tools

Besides paper and glue, you will need various tools to shape, mold, and finish your tarantula. A sturdy frame is also required to give your spider its shape. Essential tools include scissors or a craft knife for cutting paper, a paintbrush for applying the glue, and a bowl or container for mixing the glue. Consider using sculpting tools like skewers or toothpicks to help with shaping the legs and other intricate details. Also, consider using a mixing bowl for the glue and water. Lastly, a well-ventilated workspace is crucial, especially when using glue or paint.
Crafting the Tarantula Body
The body of your paper mache tarantula serves as the foundation of your sculpture. It’s the core that will eventually be covered with layers of paper and details. Careful attention to the body’s form ensures that the final product reflects the shape and characteristics of a tarantula. Take your time to shape the base structure, ensuring the proportions are accurate. Correct body proportions are also important for a successful paper mache project. Remember that building the body well at this stage will make all the subsequent steps easier and the final outcome more satisfying.
Creating the Base Structure
The base structure provides the skeletal framework for your tarantula. This framework can be created using wire, cardboard, or even crumpled newspaper shaped into the desired form and secured with tape. Consider the tarantula’s overall shape when constructing the base, focusing on the abdomen and cephalothorax. The base must be strong enough to support the paper mache layers without collapsing. Ensure that the shape is stable and representative of a tarantula. At this stage, you’re aiming for a general outline. Remember that this is where you will begin to see your tarantula take shape.
Building the Legs and Other Features

Legs are essential to giving the tarantula its distinct appearance. Use wire or pipe cleaners to construct the legs, ensuring they are the correct length and thickness to support the body. Attach the legs to the body’s base structure using tape or glue, making sure they are securely fastened. For other features, such as the fangs and pedipalps, consider using additional wire or small pieces of cardstock. The goal is to build up the details of the tarantula, creating a realistic look. Take time to position the legs in a natural way, as this affects the final aesthetic. The more attention to detail you have, the more realistic it will appear.
Paper Mache Application Techniques
Applying paper mache is a balance of art and technique. Proper layering is crucial for achieving a sturdy and well-defined sculpture. Consistency in the application of each layer, the drying process, and finishing touches determines the final quality of your paper mache tarantula. Take your time during the process; patience is a virtue. Smooth surfaces and the desired texture are achieved through careful application and consistent drying. Following these techniques ensures that your tarantula is not only visually appealing but also durable.
Applying the First Layer
Begin by tearing or cutting the paper into strips or pieces of manageable size. Dip each piece of paper into the glue mixture, ensuring it’s fully saturated. Remove any excess glue by running the paper between your fingers. Carefully apply the paper to the tarantula’s base structure, overlapping the pieces slightly to ensure complete coverage. This first layer provides the initial strength and form of the sculpture. Apply the paper smoothly, avoiding air bubbles or wrinkles. This is the most crucial part; the first layer is key to building the structure of the paper mache.
Layering and Drying Process

After applying the first layer, allow it to dry completely. Drying time will vary depending on the humidity and the thickness of the paper. Once the first layer is dry, apply subsequent layers of paper, repeating the gluing and layering process. Generally, three to four layers of paper mache are sufficient, but you may add more for extra durability. Between each layer, ensure that the sculpture is completely dry to prevent mold and ensure the stability of your tarantula. The drying process is essential to achieve a sturdy and robust final product. This process is crucial to the success of the project.
Details and Finishing Touches
Once your paper mache tarantula is fully constructed, it’s time to add the details that will truly bring it to life. This step involves refining the surface, adding texture, and preparing the sculpture for painting. Attention to detail enhances the realism of your tarantula. Use this stage to focus on the intricacies that make it stand out.
Painting and Decorating the Tarantula
Choose acrylic paints for the most realistic finish. Consider referencing images of real tarantulas to inform your color choices and patterns. Use fine-tipped brushes for detailing the eyes, fangs, and hair. Apply multiple coats of paint, allowing each coat to dry before applying the next. The painting stage allows you to customize the look of your tarantula, making it unique to your vision. Consider adding highlights and shadows to create depth and enhance realism. Consider applying a thin layer of paint to provide the proper look.
Sealing and Protecting Your Creation

After painting, protect your paper mache tarantula with a sealant. This step adds durability and protects the paint from moisture and wear. Apply a clear acrylic sealant or varnish, following the manufacturer’s instructions. This protective layer will ensure your tarantula lasts. Ensure complete coverage, paying attention to any areas with intricate details. This will ensure that your tarantula stands the test of time.
Tips for a Realistic Tarantula
To elevate your paper mache tarantula, consider these tips for achieving a realistic appearance. These techniques will add an extra layer of detail to your creation. Paying close attention to these aspects of the process ensures that your finished sculpture is a stunning and accurate representation of a tarantula.
Adding Texture and Details
Texture plays a vital role in creating a realistic appearance. Use various techniques to add texture to the body of the tarantula. Applying a thin layer of paper mache pulp or adding small pieces of paper to create a hairy effect will give it a more realistic appearance. Consider using sculpting tools to create the appearance of hairs and other details on the legs and body. Using your tools appropriately will allow you to enhance the texture to provide that special look. Pay close attention to the texture of the tarantula, as the texture makes all the difference to the appearance.
Troubleshooting Common Issues

No crafting project is without its challenges. Here are some solutions to common paper mache problems. If your paper mache is not drying properly, make sure to work in a well-ventilated space. If your sculpture cracks, add more layers of paper or reinforce the area. If you are struggling with the shaping, don’t be afraid to experiment and make adjustments. Troubleshooting and problem-solving is a part of any project. With practice, you’ll be well-equipped to handle any challenges that arise. These helpful tips will assist you with your paper mache project.
Creating a paper mache tarantula is a satisfying project, combining the joy of crafting with artistic expression. By following this guide, you’ll be well on your way to creating a stunning piece of art. Enjoy the process, embrace creativity, and celebrate the completion of your paper mache tarantula. Happy crafting!